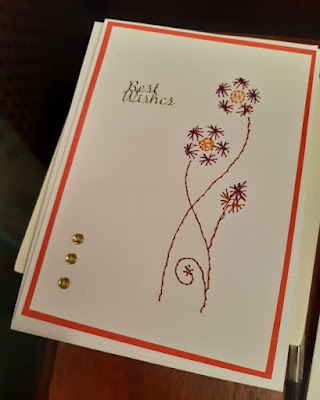
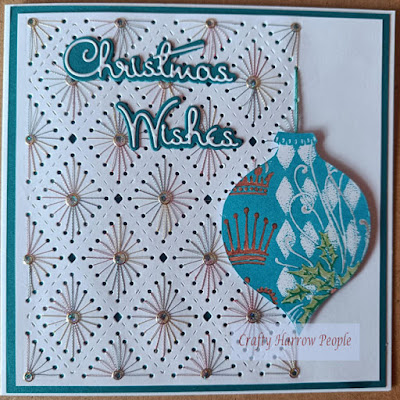
Stitching on card is one of my favourite techniques when it comes to making cards, and there are two websites where I get most of the patterns. They are Stitching Cards and Form a Lines . Both sites offer a range of patterns for (currently) £1.36, but they both have a smaller range of patterns that are free to use, and which I have permission to share in a 'class'. I did that recently, and we had some lovely results - using machine embroidery thread and 300gsm white card.
Saturday, 7 December 2024
Stitching on Card
Thursday, 7 November 2024
Playing with Clay
At today's meeting, we all revisited our childhood and had a play with clay! Some used actual air-dry clay while others used the lightweight clay that's marketed for children (and is available at much higher prices for adults under the brand name Hearty.) Apart from shaping the clay, I think we all found just handling and kneading it quite therapeutic - a bit like having a stress ball!
It will take a while for all the projects to get finished - clay takes a while to dry and if it's going to be painted, you can't really do that while the clay is wet. But, here's a first sight of what we got up to. We used hand moulding, we used various things to cut (from biscuit cutters to container tops) and also used some sugarcraft cutter/moulds.
Barbara moulded this adorable dog (with bone!) from the lightweight clay.
Thursday, 24 October 2024
Origami Shirts
Nadi led this project - she's a fan of making cards for men using origami shirts and has made quite a few.
Crochet
The first three sessions this term have been all about crochet. We have a couple of very experienced crocheters in the group, one who's happy with granny squares but struggles otherwise and several who've never tried it before. We had a lot of fun trying things out, and I expect there'll be more in this post when the things that were started get finished.
Beryl is a keen knitter but hadn't tried crochet before. She made this lovely granny square!
Friday, 19 July 2024
Freestyle Card Making
Our most recent meeting was the last of the summer term, so we had our usual planning session for next term, and then we delved in to leftover cardmaking bits to see what we could come up with!
Thursday, 18 July 2024
Recycle Challenge
We had fun re-using some things that might otherwise have found their way into a bin!
Sunday, 23 June 2024
Felt Pouches
At our last meeting, we made and decorated some felt pouches. This is a project we did about four years ago, but we've had enough new members since then, that it seemed like a good one to repeat. The pouches were decorated with die cuts of leftover felt using some Sizzix Bigz dies.
Some members are still finishing their projects, so I'll add more photos when I get them.
Friday, 7 June 2024
Fridge Magnets with Sticky Notes
The project this time was fairly simple, making fridge magnets which hold a pad of sticky notes using lolly sticks.
Saturday, 25 May 2024
Thread Catchers
Sue H ran our most recent project - something completely different too! We made thread catchers. I know that anyone who has ever sat stitching or sewing knows how many thread ends and scraps you get as you work. The idea of the thread catcher is to store these until you can get rid of them. It's a clever idea. They twist up to keep the threads inside.


